Go to theme: Boyo
Table of content
1. Theme Installation
1.1. Installation via the WordPress admin panel
After logging in to the WordPress panel, enter Appearance > Themes > Add New and enter the name of the theme you are looking for, namely Boyo.
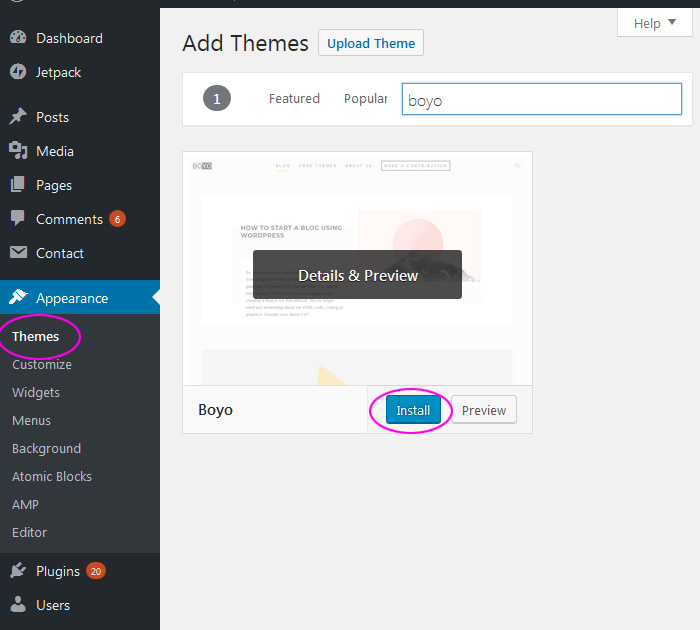
By installing the theme directly from the WordPress.org website, you can be sure that you are downloading the latest version of the template.
Then click Install and after a moment Activate. A list of recommended plugins will appear at the top of the screen, click Begin installing Plugins.

Select all by clicking on the square at the top, and then select Install from the drop-down list and Apply. Now you have to activate the installed plugins – select all and select Activate from the list and then click Apply.

If you’re just starting out with blogging and do not know where to start, we’ve added the ‘One click demo import’ button to make it easier. Thanks to this, you can import the entire demo along with all settings.
2. Demo import
NOTE: At the moment demo import functionality was removed because of wordpress.org’s theme repository restrictions. We plan to restore this functionality via external plugin.
To import the Boyo’s demo, go to Appearance > Import Demo Data. Then select one of the two available demos and click Import, confirm your selection again and you’re done.

WordPress adds test data during the first installation.
If you have not added your posts in the WordPress panel yet and you have not changed WordPress settings, the test plugins will be added to the Top widget (ie at the very top of the page).

But do not worry, you can easily remove them by entering Appearance > Widgets > Top.
To do this, left-click on a specific plugin (all in turn), hold down the button and drop the plugin on the left.

2.1. Menu settings after importing a demo
When you import demo data, the demo menu will remain invisible. To view the menu, go to Appearance > Menus, select Menu from the drop-down list and click Select.

At the bottom of the page, select Primary, indicating that it is the main menu. Finally, save the changes by clicking on the Save Menu button.
By importing the demo you also import the menu settings, do not forget to adjust the menu to your needs.

In Boyo theme you have the option to add a custom menu at the bottom of the page.

If you do not know how to add a menu at the bottom of the page, read Custom menu settings here.
3. Setting up the Front Page
3.1. Blog & Archive Page Settings
In the Boyo theme on the home page (blog page), you can display posts in one or three columns.
Enter Appearance > Customize > Blog & Archive Pages and select the layout that suits you best from the drop down list.

Finally, click the Publish button to publish the changes.
On the blog page, you can display post titles with a short description or only the title – if uncheck ‘Show excerpt on blog archive pages’.
3.2. Custom Logo
Please go to Appearance > Customize > Site Identity > Select logo

REMEMBER
The best image height is 30px, then the logo will display correctly.
In the Site Identity section, you can also set a site icon, which is a small icon that is displayed at the top of the browser tab.
Here you can also set Site Title and Tagline.
3.3. Colors
By entering Appearance > Customize > Colors you can change the background color, main content background color, and colors for each post format.

3.4. Highlighted posts
Highlighting Posts in the Boyo theme is nothing but marking them like sticky in the WordPress panel. How to do it?

3.4.1. Display Sticky Posts
You can make a sticky post from the Quick Edit option under the post.
Please go to WordPress Dashboard > Posts > All Posts. Find post, go to Quick Edit option and Make this post sticky by checking the tick box > Update


or you can also open up the post’s page go to Visibility (the ‘Publish’ section in the Post editor on the right) click Edit and check ‘Stick this post to the front page’, click OK and Publish.

Of course, remember that if you want the image to be displayed, you must set it first. The image that is displayed on the page is nothing but the featured image.
3.4.2. Set up Featured Image
Featured Image represent the contents, mood or theme of a post. Featured Image is used in a number of areas like on the homepage, post page, etc.
Open the editor of the post (please go to > Posts > All Posts) then Open the post in which you want to display a unique custom header image (featured image).
Locate the Featured Image module on the right. Click Set Featured Image. Now You can upload your image or choose one from your Media Library.

Be sure to update your post when you’re finished.
4. Custom menu
The Boyo theme has 1 top menu.
To add a custom menu in the Boyo theme go to Appearance > Customize > Menus (or Appearance> Menus).
Click Create New Menu, give it a name and check ‘Primary’ if you want it to be the main top menu, click Next < Add Items < Publish.

In the demo, you will also find the auxiliary menu placed in the Footer Widget. To add such a menu, enter Appearance > Customize > Menus (or Appearance> Menus).
Click Create New menu, give it a name and click Next < Add Items < Publish as you did before.
When your Menu is ready, you just have to put it in the bottom area of the site (exactly in the Footer Widget). To do this enter Appearance > Customize > Widgets > Footer < Add a Widget and select Navigation Menu from the list and select the appropriate Menu from the Select Menu field.
Here you can also go if you want to edit the menu to make changes in it or finish by pressing the Publish button
4. Widgets Areas
The Boyo has 3 different widgets areas: Top, Bottom, and Footer. You can add additional content to your website in 3 different, specially prepared areas.

To configure individual widgets areas please enter Appearance > Customize > Widgets (or Appearance > Widgets)
If you want to change the place of displaying a given plugin within the same area, right click on it, hold and move it.
In turn, if you want to move a given plugin to another widgets area, go to Appearance > Widgets and drag it to the place you want.
4.1. Top
The Top Widget area has been specially prepared to display ads that you may need on your blog.

You can do this by adding an Image widget or Custom HTML widget. Please go to Appearance > Customize > Widgets (or Appearance > Widgets) > Top > Add a Widget > Image or Custom HTML.
When you select Custom HTML in the Content field, enter:
<a href="link, where the image redirect after clicking"><img src="image URL" alt="alternate text" class="aligncenter"></a>
and enjoy your advertisement.
REMEMBER
By adding class = “aligncenter” your image will be centered.
If you do not know where to find the image URL, read further on point 4.1.1
4.1.1. Adding Banner / Image / Advertising
To add an advertisement or banner, first, you must prepare an image. Be sure to read the article: Optimization of images in WordPress. How you should do it and why it is so important.
Then add the image to the Media Library in WordPress. Please go to Media > Library > Add New and Drop your image in the designated place or click Select File to select the image from your computer.
In order for the photo to appear on your website, you need to know its URL. You will find it by clicking Edit on the right side of the loaded photo

or go to Media > Library click on the photo you like – URL address is on the right.

Copy the URL, then please go to Appearance > Customize > Widgets > Left Menu > Add a Widget > Custom HTML and enter the following in the body area:
<a href="link, where the image redirect after clicking"><img src="image URL" alt="alternate text"></a>
4.2. Bottom Widget
The bottom is an area where you can put different plugins. The first three are displayed side by side in three columns. Other plugins are displayed one below the other.
In our demo, you will find here Custom HTML widget (About), Recent Posts and Tags.

4.3. Footer Widget
The footer widget area displays plugins in three columns. Here you will find the Navigation Menu widget with specially prepared menus, as well as Custom HTML where you will find copyright info.
To add or change Text please go to Appearance > Customize > Widgets > Left Menu > Add a Widget > Custom HTML and write your text in the content area.

5. Displaying a capital letter in a post or page

To add a capital letter to your content, you need to open a post or page and go to the Text tab editor. The ‘Text tab’ is used to writing in HTML code.
Then in the place where you want a large letter to appear, paste the following code:
<span class="first-letter">YOUR LETTER</span>

6. Supported plugins
The Boyo theme is ready for use with the following WordPress plugins:
- Jetpack by WordPress.com – tiled gallery display in the post.
- Contact Form 7 to display contact forms.
- One Click Demo Import – to import a demo.