Blogging has become a part of our lives, a new field in which many succeed. This success encourages others to start blogging. Every day, thousands of people around the world begin their adventure with blogging, and finally, you’ve decided to set up your blog too – it’s excellent!

Sure, you have many doubts and questions – it’s normal, do not worry. You can do it entirely by yourself. So let’s begin!
In this article, you’ll learn everything you need to start your self-hosted WordPress blog. I will show you step-by-step how to set up host your WordPress Blog on SiteGround, how to easily install WordPress and customize the theme to your needs.
If you want to know more: How to start a blog, take a look at my article.
Disclosure: Please note that when you purchase hosting using our SiteGround affiliate link, they compensate us, which helps us make our blog & themes free of charge to you. Know that we recommend only products, tools or services that we have tested.
Four steps how to set up a WordPress blog on your own with SiteGround hosting provider:
- Get a web hosting account in SiteGround
- Find a domain name
- Install free blogging software and set up a blog
- Design your blog
You may also like

Every day, thousands of blogs are created, and every blogger dreams of living exclusively from his passion – blogging. It is possible; you have to set up a self-hosted WordPress site for your blog. This is the best solution if you think seriously about blogging.
You probably wonder what the self-hosted WordPress website means. For such a website to work, you need your hosting from the proper hosting provider (I recommend Siteground), your domain name and a free CMS system (WordPress is the best solution) that will allow you to manage your site.
Step 1. Get a web hosting account in SiteGround
For bloggers, I recommend SiteGround. SiteGround has excellent WordPress solutions in terms of speed and security. It is fast, cheap, and reliable, and above all, it is easy to use for beginners. Here you may read why we recommend SiteGround: Best blog hosting
GOOD TO KNOW
You can change your hosting provider and transfer your site at any time.
You may also like
Blog Hosting For Bloggers
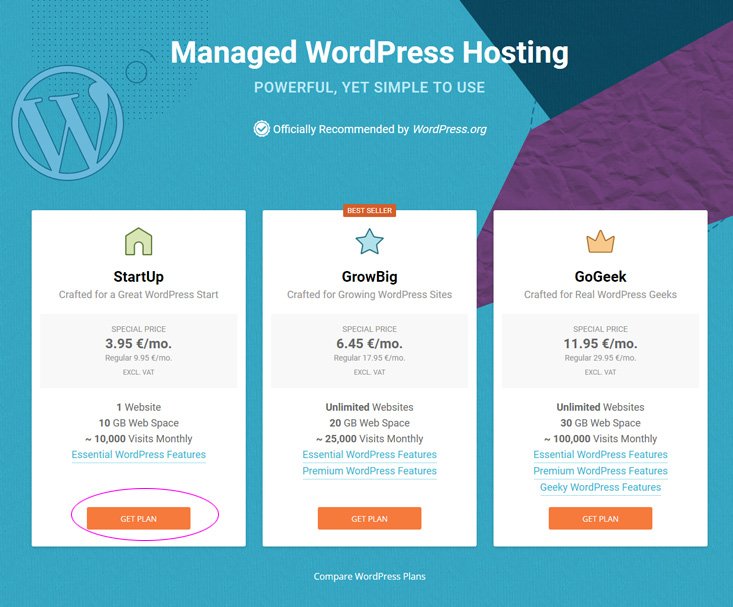
Choose a plan which has sparked your interest. I advise using the ‘StartUp’ plan in the beginning – it’s cheap and has all the necessary functions which you will need now. You can always upgrade later if you decide you want more advanced WordPress features.
To start to click the ‘Get Plan’ button.
Step 2. Pick a domain name
You may also like
Best Blog Niches
Most Popular Blogs
The domain name is the internet address where readers will find your blog (our domain name is: blogonyourown.com). The domain name is a crucial element of your blog. Before you choose the right name, think twice. Do not rush with your choice.
The domain name should be short, but above all, easy to remember, it should be associated with your blog or with you. Treat it as if you were choosing a name for your company as if you were creating a new brand. It is not an easy task, but it is one of the essential elements that can contribute to the success of your blog.
To learn more, read my article: how to choose the right domain name
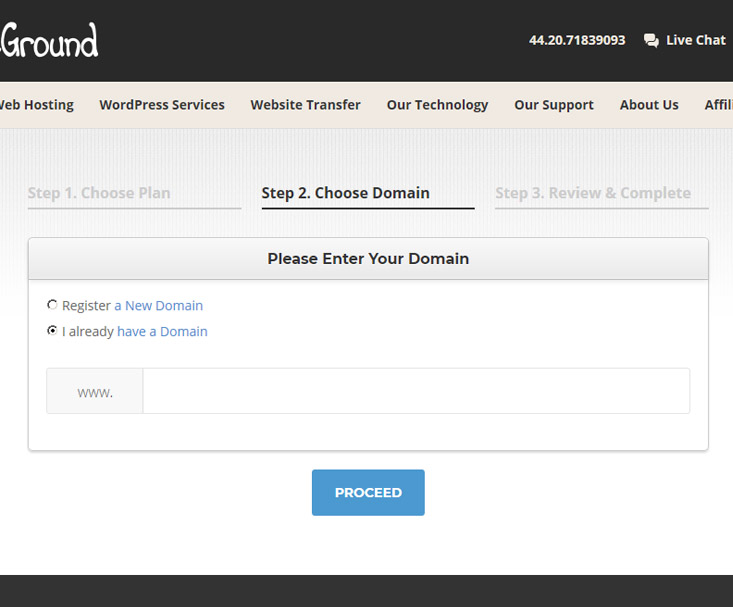
Write the name of the domain you want to use and click ‘Proceed.’ If this name is available, you can register it with your hosting account.

Be aware that the domain you want to use may not be available. In this case, Siteground will suggest you use an alternative name that will have a different extension, e.g., .net or.org. Consider whether this name corresponds to you.
The domain name is significant and needs to be thought of, so take your time.
Already have a domain name?
Just click ‘I already have a domain,’ then write it in the provided space, and click ‘Proceed.’
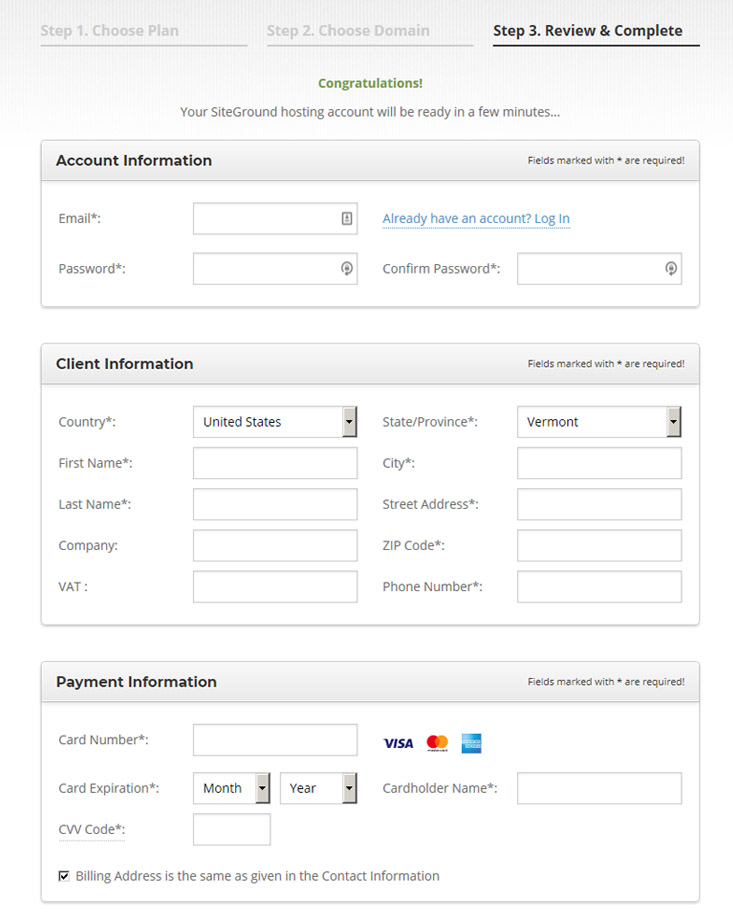
When you chose your domain or used the one, you already have and own, provide all the necessary information on the next page.
2.1. Enter Account, Client and Payment Information
Make sure you use your active email address because your personal details will be sent there.
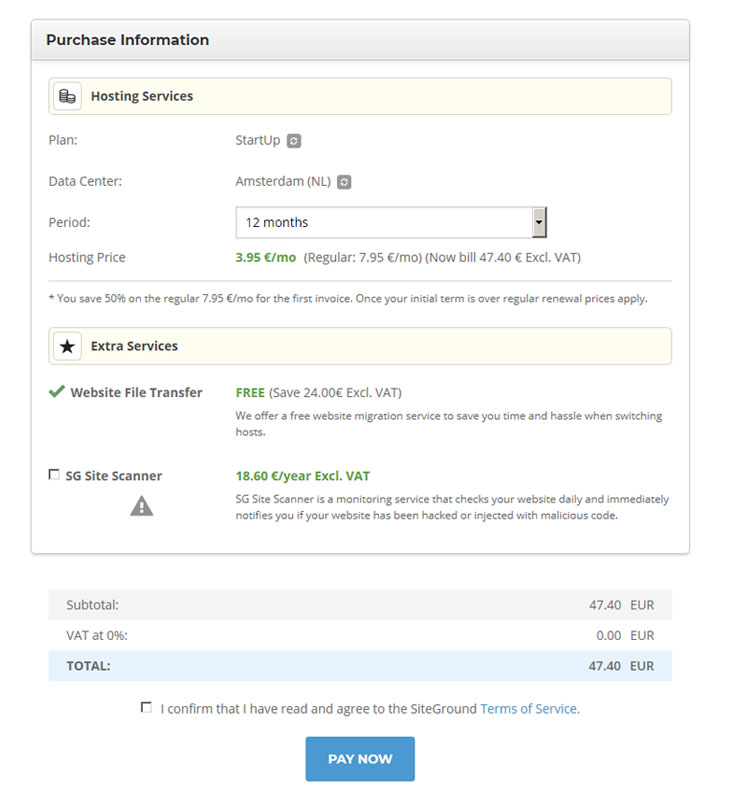
2.2. Enter Purchase Information
You may also like
Choose the nearest Data Center and the period of payment, depending on how much earlier you want to pay. SiteGround offers the possibility of paying in advance for a period of 12, 24, or 36 months.
Add additional services if you want, but, they are not necessary at this stage. You can skip them if you wish.
Confirm that you’ve read the fine print and then click ‘Pay now’ to complete your purchase.
After registering in the hosting packet (Step.2), you will receive all the information necessary to log in to the SiteGround Customer Area.
Step 3. Install free blogging software and set up a WordPress blog.
It’s time to install WordPress. Log in to your new SiteGround account.
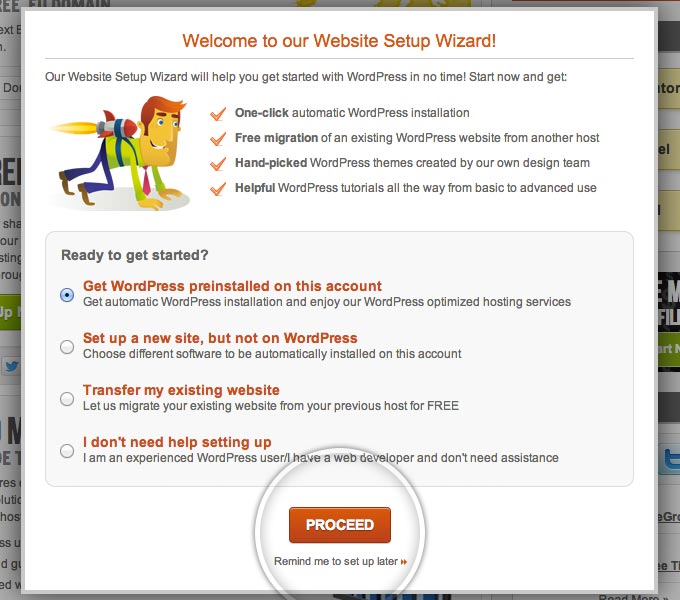
When you first log to your Customer Area, a popup ‘Welcome to our Website Setup Wizard!’ will appear, asking if you want to have WordPress preinstalled on your account. Select that option and click on the ‘Proceed’ button.
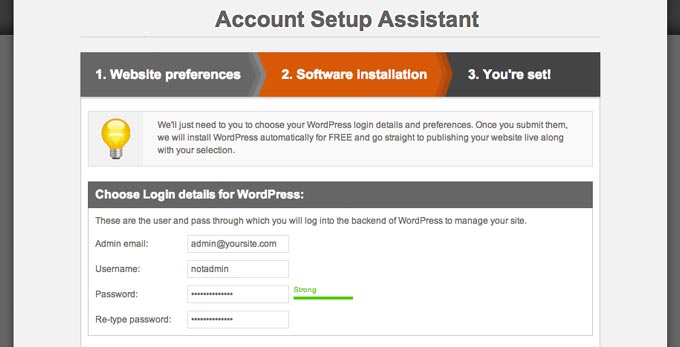
3.1. Choose login details for WordPress
Then, enter your login details (username and password), which will help you later to log in to your WordPress blog.
GOOD TO KNOW
To log in to your website, you will need your Username and Password.
It’s vital that you know, that in WordPress the default username is always ‘Admin.’ Everyone knows it, so for your safety and security of your site, change your username to something more unique.
REMEMBER
Change your username from “Admin” to something more unique.
3.2. Choose WordPress theme
You may also like
In the next step, SiteGround will ask you to choose one of the free themes available on their site. It is not important which theme you choose. We will change it together later in the article. Click on the ‘Submit’ button.
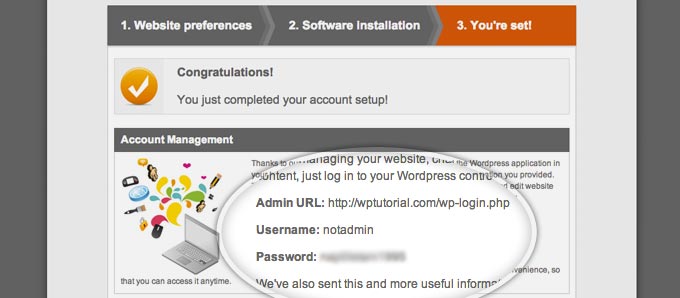
At the final stage, a summary brief of the process of WordPress installation will appear, containing the information such as username, password, and where to find your blog’s dashboard.
3.3. Login to your WordPress dashboard
The login panel in WordPress is always the same and looks like the picture below. You can find it by typing in the URL address of the browser:
https://www.yourdomainname.com/wp-admin/
Of course, 🙂 “yourdomainname.com” is your domain name.
To log in to the WordPress dashboard, you will need an email address or username and password.

REMEMBER
Access to your new blog’s dashboard:
www.yourdomainname.com/wp-admin
And that’s it. Congratulations!
Now you know how to create a blog using WordPress. You have created the hosting account yourself, and you have installed WordPress. You are the owner of the self-hosted blog now! Great!
Now it’s time to take care of the look of your blog.
Step 4. Designing your blog
WordPress is an entirely free and open-source content management system (CMS) available at wordpress.org.
In WordPress, the theme is responsible for the look of your blog, and plugins are responsible for its functionality.
WordPress.org offers over 7,000 free themes and over 50,000 plugins.
Thanks to such a vast number of free themes and plugins, it is an irreplaceable tool for creating websites.
REMEMBER
Themes are responsible for the website’s appearance, plugins – for its functionality.
If you’re starting your blog, you do not want to have extra costs. You can choose the right theme for your blog completely for free. Select the necessary functionality using the available free plugins, and your blog is ready. Amazing, right?
In this section, I’ll show you
4.1. Meet the WordPress dashboard
4.2. How to add or change the WordPress Theme
4.3. How to configure your blog to be search engine friendly
4.1. Meet the WordPress dashboard
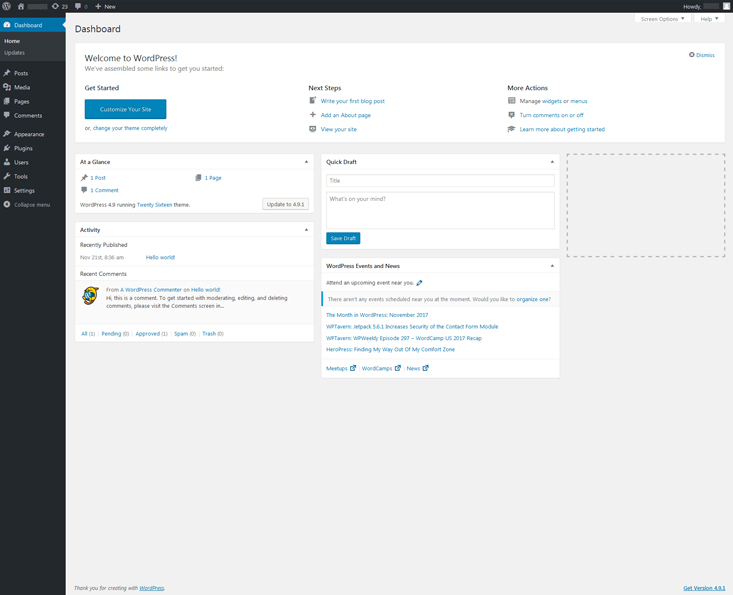
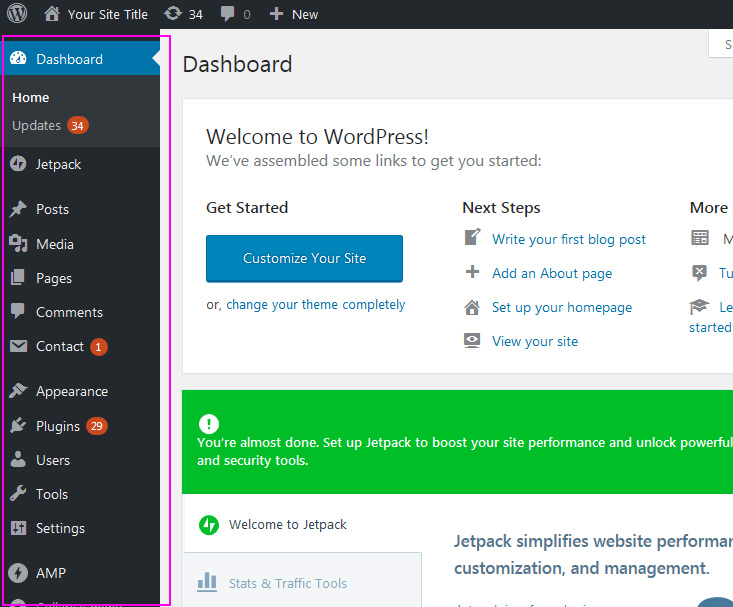
After logging to your WordPress blog, you will see the following screen: the main Administration Screen called the Dashboard.
REMEMBER
You can log in to your blog by going to
www.yourdomainname.com/wp-admin
And using the credentials you set up with SiteGround or any other hosting company you used.
4.1.1. Top menu
At the top of the black bar, you will find a menu.
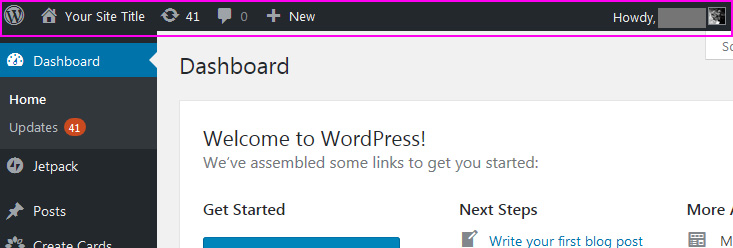
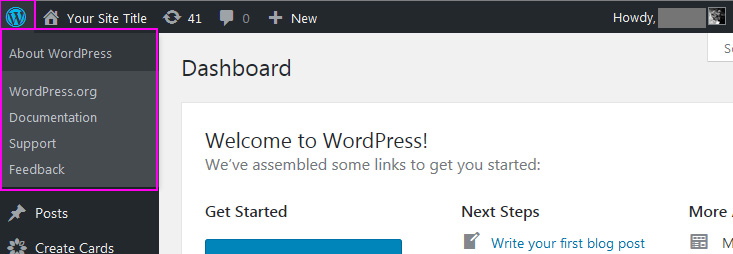
- After hovering over the WordPress icon (first from the left) a menu will appear. Here you will find the transition to the wordpress.org website, a link to the WordPress documentation and support.
- When you hover on ‘Your Site Title’ you will see a ‘Visit Site’ link. When you click on it, you will see how your page looks on the internet.

- The next two icons concern updates and comments.
- The ‘+New’ icon allows you to add a new post, page, user, etc.

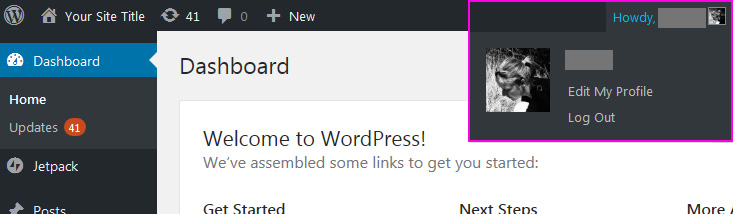
- In the top right corner, there is an icon that you can use to log out of the WordPress dashboard. Here you can also edit your profile.
4.1.2. Left Sidebar
On the left, you will find an extensive sidebar, which is the heart of your site. Here are the most important things you will use to create content for your blog.
4.2. Add or change the WordPress theme
After logging in to the WordPress dashboard, the theme you have selected during the installation will be active. If you have not selected any theme, the default WordPress theme will be active.
Now you can change it.
Go to Appearance < Themes < Add New

4.2.1. Find your perfect theme
Now you need to find the best theme for yourself, the one that is closest to your expectations.
You may also like
Because there are a lot of themes, it will be a demanding task. But do not be discouraged. Determine the most critical features of your blog, what you need, and then stick to the designated goal.
On the right, you can type the name of the theme which you know or tag -such as ‘blog’- and search for the most suitable theme for you among the other screened ones.
Don’t get discouraged:)

4.2.2. Check the author’s theme and reviews
Each theme available on the wordpress.org website has its website.
Before you decide to download a theme, it is worth reading the reviews, getting to know the author, check what support he offers whether a theme which you have chosen is regularly updated and whether the author has his website.
It’s good to know what you can expect.

All themes available at wordpres.org are free (GPL-licensed), that is why you may want to check, whether a theme which you have chosen is regularly updated, and if it has support in case of any troubles.
4.2.3. Install & Activate your theme
There are a lot of themes, and you can lose plenty of time searching for the perfect one. Choose something that you will love, something that will suit you and your readers’ taste.
After you make up your mind, click Install and then Activate.

And that’s it!!! It’s done!!
Many theme authors sell Premium versions of their free themes, but you don’t need all of these functions at the beginning. It will be enough if you choose a theme, which you should be able to use easily on your own, without the need to generate additional costs.
But in case you need to tweak a bit of your blog design or functionality, you may check out our customization service or read our other article: Where to find the best WordPress developers?
4.3. Configuring your blog to be search engine friendly
4.3.1. Change your permalinks
Once you’ve chosen your favorite theme, you can set up your blog to be search engine friendly. It’s nothing hard. We’ll do everything together. It will take a moment.
Enter Settings < Permalinks and choose Post name


Read about
What is Permalink in WordPress and What Structure of Permalinks to Choose
WordPress offers the option of creating a custom URL structure for your permalinks and archives. Non-standard URL structures can improve the aesthetics, usability, and forward-compatibility of your links.
4.3.2. Set up Comments
Comments are the foundation of blogging. Thanks to them, you know what your readers think. Unfortunately, the comments are also the bane of every blogger. Why? Because many companies use automatic spam, leaving comments with links to various websites for promotion.
You do not want to have spam on your blog. Right?
To control messages appearing on your blog, go to :
Settings < Discussion and choose two options
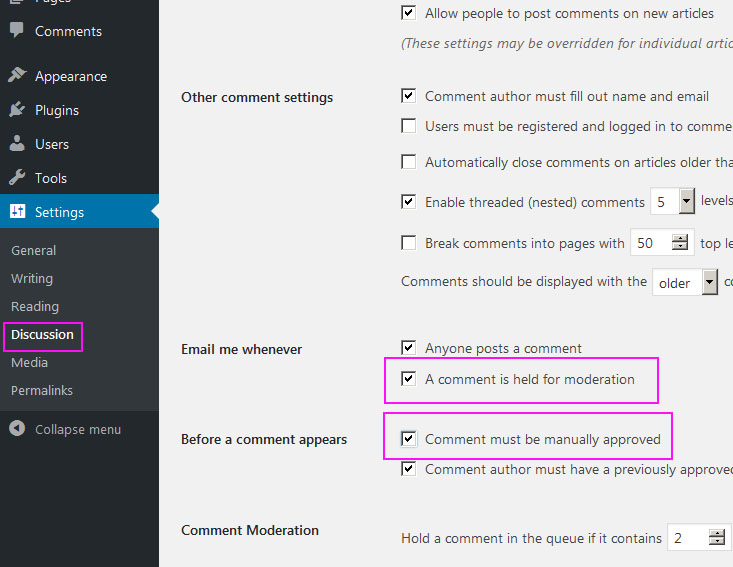
From now on, all incoming comments will have to be accepted before they appear on your blog.
4.3.3. Check your username
If you are not sure, whether you changed your default username ‘admin’ to your own, you can quickly check it.
To do that, click Users > All Users
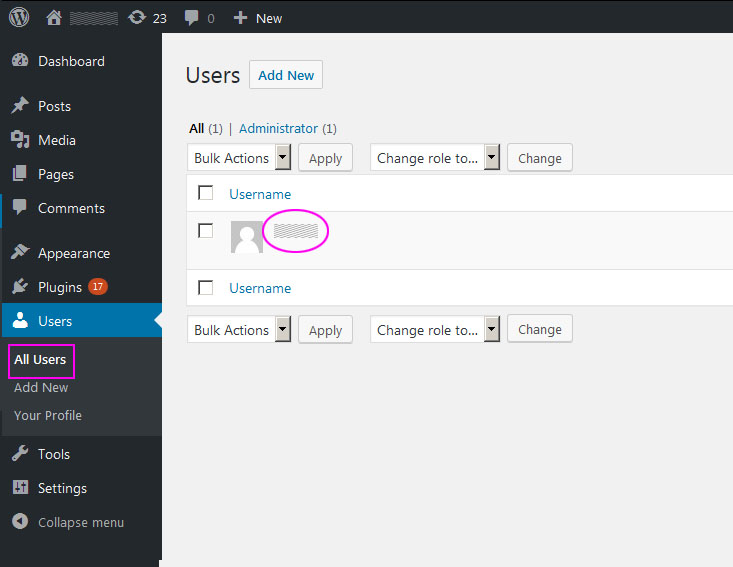
If your ‘Username’ is different from an ‘admin,’ you do not have to do anything.
In turn, if it is an ‘admin’ username, be sure to change it as soon as possible.
You may also like
What to Blog About – 14 Ways to Choose a Blog Topic
WordPress is very popular, and everyone knows that an ‘admin’ is the default ‘Username.’ By leaving the default settings, you risk hacking attacks.

At this point, you have a fully operational and well-configured WordPress blog with your theme and your domain.
AMAZING:)!
You have done so much – I am proud of you :).
Your blog is now ready for work.
At this moment, the question “how to configure a WordPress blog on SiteGround” is not so mysterious anymore. Big relief right :)?


Hello
A few questions about siteground and wordpress. How do I install a subscribe button? And put my privacy policy in my footer ? Also when I go to my blog it has the front page and then I’m making an about me page but I dont know how to make my home page my front page?
Thank you
Hi Tanya,
As for the homepage setting, in the WordPress dashboard go to Settings < Reading and choose which page should be displayed on the homepage. It’s simple and you should handle it. Some settings also depend on the theme you use, others will require appropriate plugins to be installed. Contact the authors of your theme and ask them for help.